Part 4: Pose Estimation, Body Measurement, and 3D Reconstruction
Introduction
In Part 3, we examined the core try-on engine — how PF-AFN warps garments and composites them onto people. But generating a convincing try-on image requires more than just the GAN. The system needs to understand where the body is, what shape it has, and how it is posed.
This installment covers the supporting systems that make virtual try-on practical: OpenPose for skeletal detection, Graphonomy for body region segmentation, a custom body measurement algorithm that extracts real-world dimensions from a single photo, PiFu for 3D reconstruction experiments, and a browser-based prototype using TensorFlow.js.
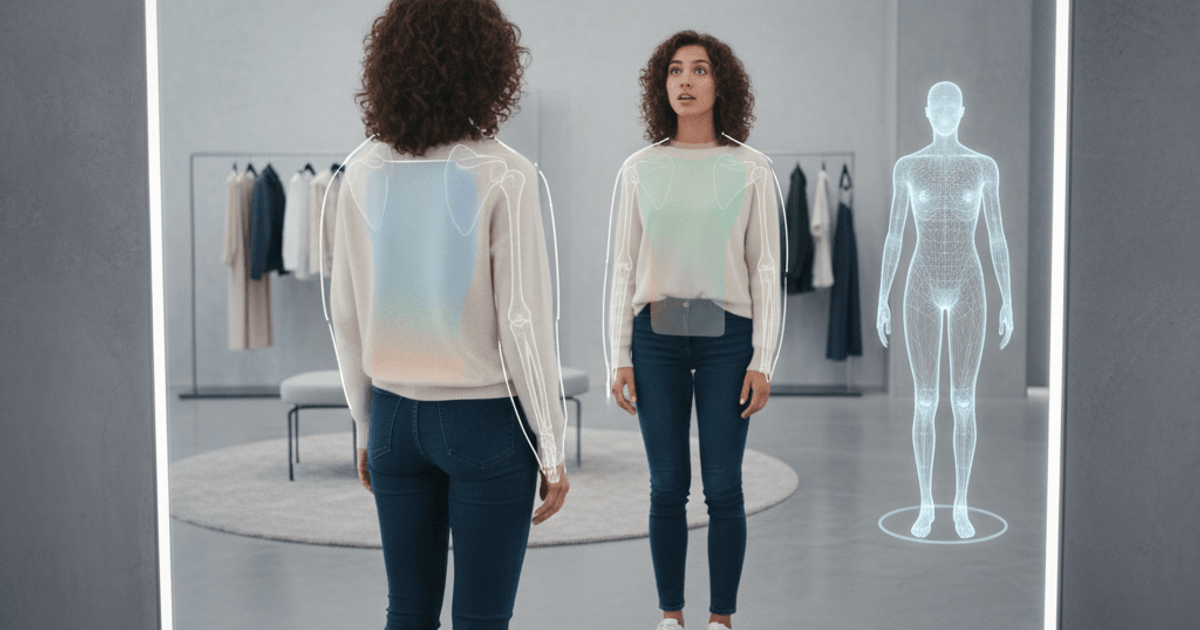
OpenPose: Understanding the Body’s Structure
OpenPose detects 18 skeletal keypoints from a 2D photograph, providing a structured representation of the person’s pose. Each keypoint corresponds to a joint or anatomical landmark:
| Index | Keypoint | Index | Keypoint |
|---|---|---|---|
| 0 | Nose | 9 | Left hip |
| 1 | Neck | 10 | Right knee |
| 2 | Right shoulder | 11 | Left knee |
| 3 | Left shoulder | 12 | Right ankle |
| 4 | Right elbow | 13 | Left ankle |
| 5 | Left elbow | 14 | Right eye |
| 6 | Right wrist | 15 | Left eye |
| 7 | Left wrist | 16 | Right ear |
| 8 | Right hip | 17 | Left ear |
How OpenPose Works
OpenPose uses a two-branch CNN architecture. The first branch predicts confidence maps (heatmaps) for each keypoint — one heatmap per joint, where the peak value indicates the most likely position. The second branch predicts Part Affinity Fields (PAFs) — 2D vector fields that encode the direction and strength of association between connected joints.
PAFs are what allow OpenPose to handle multiple people in a single image. The vectors point along limb segments (e.g., from shoulder to elbow), and a greedy matching algorithm connects detected keypoints into coherent skeletons. Each keypoint also carries a confidence score, allowing the system to handle partial occlusion — if an arm is hidden behind the torso, those keypoints simply receive low confidence rather than causing the entire detection to fail.
Role in META FIT
OpenPose serves two distinct purposes in the META FIT pipeline:
Guiding garment warping. The skeletal keypoints tell the try-on model where the person’s shoulders, torso, and limbs are positioned. PASTA-GAN++ uses this pose information as conditioning input, enabling it to warp garments that account for the person’s specific stance — whether they are standing straight, turning slightly, or raising an arm.
Enabling body measurement. The pixel coordinates of keypoints, combined with a known reference measurement (the user’s height), allow the system to calculate approximate body dimensions. This is covered in detail in the body measurement section below.
The model file used in META FIT is body_pose_model.pth, which runs within the PASTA-GAN++ Docker container alongside the main GAN.
Graphonomy: Human Parsing
While OpenPose provides the skeleton, Graphonomy provides the silhouette. It segments a person image into labeled body regions:
- Hair, Face, Skin — regions to preserve from the original image
- Upper body, Lower body — regions where garments will be placed
- Arms, Legs — boundary regions requiring careful blending
- Shoes, Accessories — regions that may or may not be affected by the try-on
Why Parsing Matters
Human parsing answers the question that skeletal keypoints alone cannot: what occupies the space between the joints? A skeleton tells you the shoulders are at coordinates (x1, y1) and (x2, y2), but it does not tell you where the shirt ends and the skin begins. The parsing map provides that pixel-level boundary information.
This is critical for the composite mask in Stage 2 of the try-on pipeline. The generator needs to know precisely which pixels belong to the current garment (to be replaced), which belong to skin or hair (to be preserved), and where the boundaries lie (to be blended smoothly).
The model file is inference.pth, and it runs as part of the PASTA-GAN++ preprocessing pipeline. Together, OpenPose and Graphonomy provide a complete structural understanding of the person: the skeleton gives the articulated pose, and the parsing gives the dense surface regions.
Automatic Body Measurement System
Beyond virtual try-on image generation, META FIT includes a body measurement feature that extracts approximate real-world dimensions from a single photograph. This enables size recommendation — telling users which clothing size would fit them best before they even see the try-on result.
The Algorithm
The measurement system, implemented in get_body_meausure.py, works by combining OpenPose keypoints with a single user-provided reference: their height.
class BodyMeasure:
    def __init__(self):
        self.pose_detector = PoseDetector()

    def measure(self, image, height_cm):
        # Detect skeletal keypoints
        keypoints = self.pose_detector.detect(image)

        # Calculate pixel-to-centimeter ratio from height
        pixel_height = self._compute_pixel_height(keypoints)
        pixel_ratio = height_cm / pixel_height

        # Derive measurements from keypoint distances
        measurements = {
            'body_length': self._body_length(keypoints) * pixel_ratio,
            'shoulder_width': self._shoulder_width(keypoints) * pixel_ratio,
            'sleeve_length': self._sleeve_length(keypoints) * pixel_ratio,
            'inseam': self._inseam(keypoints) * pixel_ratio,
        }
        return measurements
The fundamental principle is straightforward: if the user tells the system they are 170cm tall, and the system detects that their full height occupies 500 pixels in the image, then 1 pixel equals 0.34cm. Every other measurement is then a matter of computing pixel distances between the appropriate keypoints.
Measurement Derivations
Each measurement maps to specific keypoint pairs:
| Measurement | Keypoints Used | Calculation |
|---|---|---|
| Shoulder width | Right shoulder (2) to Left shoulder (3) | Euclidean distance |
| Sleeve length | Shoulder to Elbow + Elbow to Wrist | Sum of two segment distances |
| Body length | Neck (1) to midpoint of hips (8, 9) | Distance multiplied by 2 |
| Inseam | Hip to Knee + Knee to Ankle | Sum of two segment distances |
| Chest | Estimated from shoulder width + body proportions | Empirical formula |
| Waist | Estimated from hip positions + proportional model | Empirical formula |
| Hip | Right hip (8) to Left hip (9) with correction | Adjusted distance |
The direct measurements (shoulder width, sleeve length, inseam) rely purely on keypoint geometry. The circumference-based measurements (chest, waist, hip) require additional estimation, since a 2D photo does not directly reveal depth. These use empirical correction factors derived from calibration data.
Validation
The measurement system was validated against 10 test subjects ranging from 158cm to 178cm in height. For each subject, the system’s automated measurements were compared against manual tape measurements across all seven dimensions.
The results showed that direct linear measurements (shoulder width, sleeve length) achieved reasonable accuracy, while circumference estimates (chest, waist, hip) showed higher variance — an expected limitation of deriving 3D body dimensions from a single 2D image.
Despite this limitation, the system provides sufficient accuracy for size recommendation purposes. The goal is not to match a tailor’s precision, but to determine whether a user would be better served by a Medium or a Large in a particular brand’s sizing chart. For that purpose, approximate measurements combined with brand-specific size tables are adequate.
PiFu: Exploring 2D-to-3D Reconstruction
One promising direction I explored was moving from 2D virtual try-on to 3D avatar-based fitting. PiFu (Pixel-aligned Implicit Function) offered a compelling approach: reconstruct a full 3D mesh of a person from a single 2D photograph.
Architecture
PiFu uses HGPIFuNet (Hourglass PIFu Network), which combines two components:
Hourglass Image Filter. A recursive multi-scale feature extractor (configured with num_hourglass=2, hourglass_dim=256, num_stack=4) that processes the input image into rich spatial features. The hourglass architecture performs repeated downsampling and upsampling with skip connections, capturing both fine detail and global structure.
Surface Classifier. A multi-layer perceptron (MLP) with layer dimensions [257, 1024, 512, 256, 128, 1] followed by a sigmoid activation. For any 3D point (x, y, z) in space, it takes the pixel-aligned image feature at (x, y) along with the depth coordinate z, and predicts the probability that the point lies inside or outside the body surface.
Input: pixel-aligned feature (256-dim) + depth value (1-dim) = 257
  -> 1024 -> 512 -> 256 -> 128 -> 1 (sigmoid)
Output: inside/outside probability
By querying this classifier on a dense 3D grid and extracting the 0.5 isosurface (via marching cubes), PiFu produces a complete 3D mesh as an .obj file. The result is a detailed body shape that captures the person’s proportions, pose, and even clothing folds from the input photo.
The Decision to Stay 2D
The 3D reconstruction itself worked well — PiFu produced plausible meshes from single images. However, using those meshes for virtual try-on introduced a substantially harder problem: 3D garment simulation.
Draping a garment onto a 3D body requires cloth physics simulation — modeling fabric stiffness, gravity, collision detection between cloth and body, friction, and wrinkle formation. This is an entire field of research in itself, and integrating it with the PiFu pipeline would have increased the project’s complexity by an order of magnitude.
Given the project’s goal of producing a functional prototype, I made the pragmatic decision to focus on the 2D approach (PASTA-GAN++) for the initial version. PiFu remains a documented exploration and a viable path for future iterations — particularly as 3D garment simulation tools continue to mature.
Web Prototype: TensorFlow.js and PoseNet
As a proof-of-concept for browser-based try-on, I built a lightweight prototype using TensorFlow.js with PoseNet for real-time pose detection directly in the browser.
How It Works
Camera feed -> PoseNet (in-browser) -> Shoulder keypoints detected
                                          |
                                    Calculate garment position & scale
                                          |
                                    Overlay garment PNG on video feed
The prototype captures the user’s camera feed, runs PoseNet to detect body keypoints in real time, and overlays a garment PNG at the correct position and scale based on the detected shoulder positions. The shoulder width determines the garment’s horizontal scale, and the shoulder midpoint determines its vertical placement.
What It Demonstrated
The browser prototype runs at interactive frame rates without any server-side processing — everything executes in the client’s browser using WebGL-accelerated TensorFlow.js. This demonstrated the fundamental concept: a user can point their camera at themselves and see clothing overlaid on their body in real time.
Limitations
The prototype uses simple 2D overlay, not GAN-based compositing. The garment does not conform to the body’s contour, does not handle occlusion (arms in front of the garment), and does not account for fabric draping or perspective. It looks more like an augmented reality sticker than a true virtual try-on.
However, it served its purpose as a proof-of-concept: it validated that real-time pose detection in the browser was viable and that the basic user interaction flow — point camera, see garment — worked intuitively. The gap between this simple overlay and the photorealistic output of PASTA-GAN++ illustrates precisely why the GAN-based approach, with all its computational requirements, is necessary for a convincing result.
How the Systems Connect
It is worth stepping back to see how all these components fit together in the full META FIT pipeline:
User photo
  |
  +-> OpenPose ---------> Skeletal keypoints (18 joints)
  |                            |
  +-> Graphonomy -------> Body region segmentation map
  |                            |
  +-> BodyMeasure ------> Size recommendation
  |       (uses OpenPose)      |
  |                            v
  +-> PASTA-GAN++ ------> Virtual try-on image
        (uses OpenPose + Graphonomy + garment image)
A single user photo feeds into multiple processing paths. OpenPose and Graphonomy provide structural understanding. The body measurement system produces sizing information. And PASTA-GAN++ uses all of the above, plus the target garment image, to generate the final try-on result.
What Comes Next
With the core engine and supporting systems covered, the final installment examines what worked, what did not, and where virtual try-on is headed. We will look at systematic failure modes documented during testing, the smartphone app design, and how the shift from GANs to diffusion models is reshaping the landscape.
META FIT Series:
- Part 1: From Photo Booths to Virtual Try-On
- Part 2: Understanding GANs — The Engine Behind Virtual Try-On
- Part 3: Inside PF-AFN — The Try-On Engine in Code
- Part 4: Pose Estimation, Body Measurement, and 3D Reconstruction (You are here)
- Part 5: Results, Failure Modes, and the Path to Modern Image Generation